Check In a Shipment
Overview
Shipment information can be updated directly within the Document Check In Required search grid. General information can be updated by clicking on the information to be updated and editing as necessary. Information that can be updated includes:
- Pieces
- Weight
- Piece Type
- BOL number
- Carrier Pro number
- Customer Reference ID
- NMFC Class
Once all necessary changes have been made, the shipment should be Checked In. This confirms that the information in Optimiz matches the information from the shipment's paperwork.
Prerequisites
Before you can update shipment information, you must access the Document Check In Required tile. See Access Document Check In Required.
Note: In-bond freight and hazardous materials require special handling and must be identified properly in Optimiz. If the shipment contains In-bond freight or hazardous material, jump to the To Check In a Shipment Containing In-bond Freight or Hazmat section below.
Process
To Check In a Shipment:
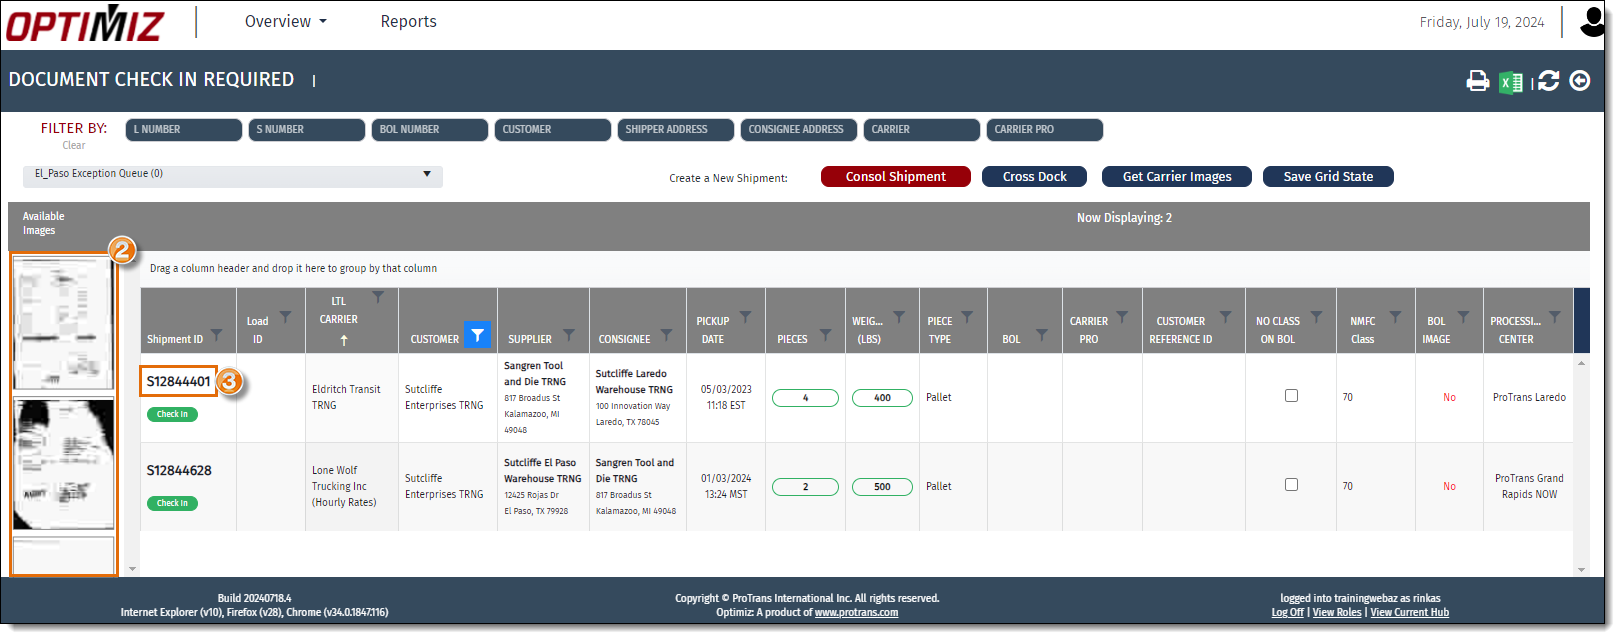
- Locate the shipment to be updated in the grid, or search for the shipment if needed. See Search for a Shipment.
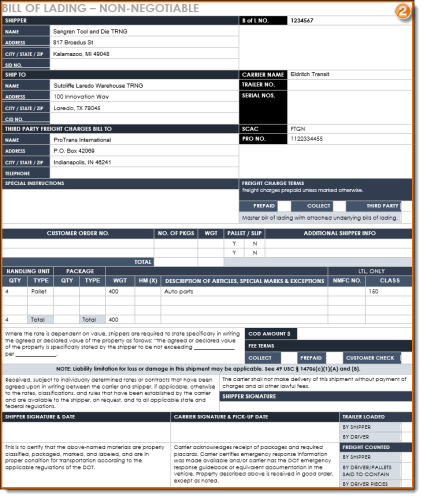
- Select the image(s) from the Available Images column that match the shipment to be checked in. The selected image(s) will open in a new window. If no images are available in Optimiz for the shipment to be updated, scan the paperwork to the queue. Alternatively, the images may be available on the LTL pickup carrier's website. See Get Carrier Images for details.
- Compare the information displayed on the image(s), to the information in the grid. If the pieces, weight, piece type, BOL number, Carrier PRO, Customer Reference ID, or NMFC Class in Optimiz do not match the paperwork, update the data in Optimiz directly in the results grid to match the paperwork.
- If the BOL image does not have the NMFC listed, check the No Class on BOL check box.
- After all updates have been made, click the green Check In button to confirm that the shipment's information in Optimiz matches the paperwork received.

The information in the grid is updated, the selected images are uploaded to the shipment and disappear from the queue, the shipment disappears from the grid, and the shipment is checked in.
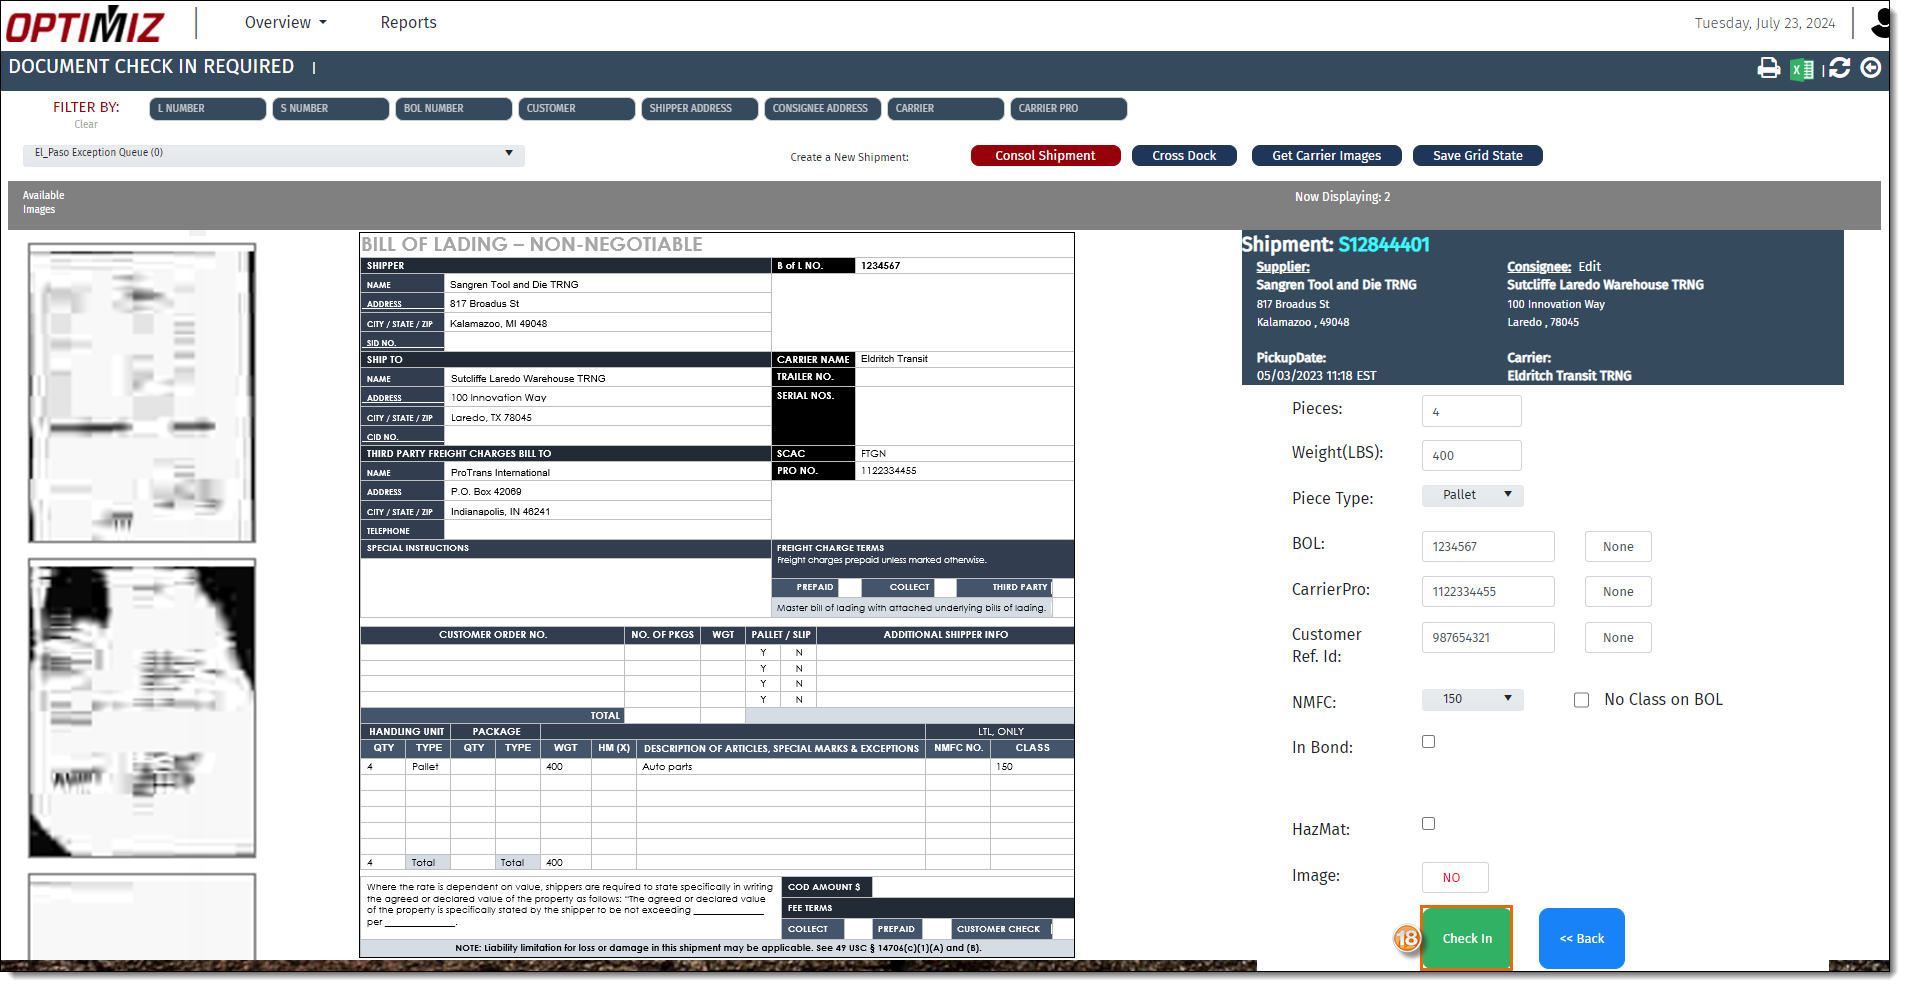
To Check In a Shipment Containing In-bond Freight or Hazmat:
- Locate the shipment to be updated in the grid, or search for the shipment if needed. See Search for a Shipment.
- Select the image(s) from the Available Images column that match the shipment to be checked in. The selected image(s) will open in a new window. If no images are available in Optimiz for the shipment to be updated, scan the paperwork to the queue. Alternatively, the images may be available on the LTL pickup carrier's website. See Get Carrier Images for details.
- Click on the Shipment Number in the grid.
The Check In window opens.
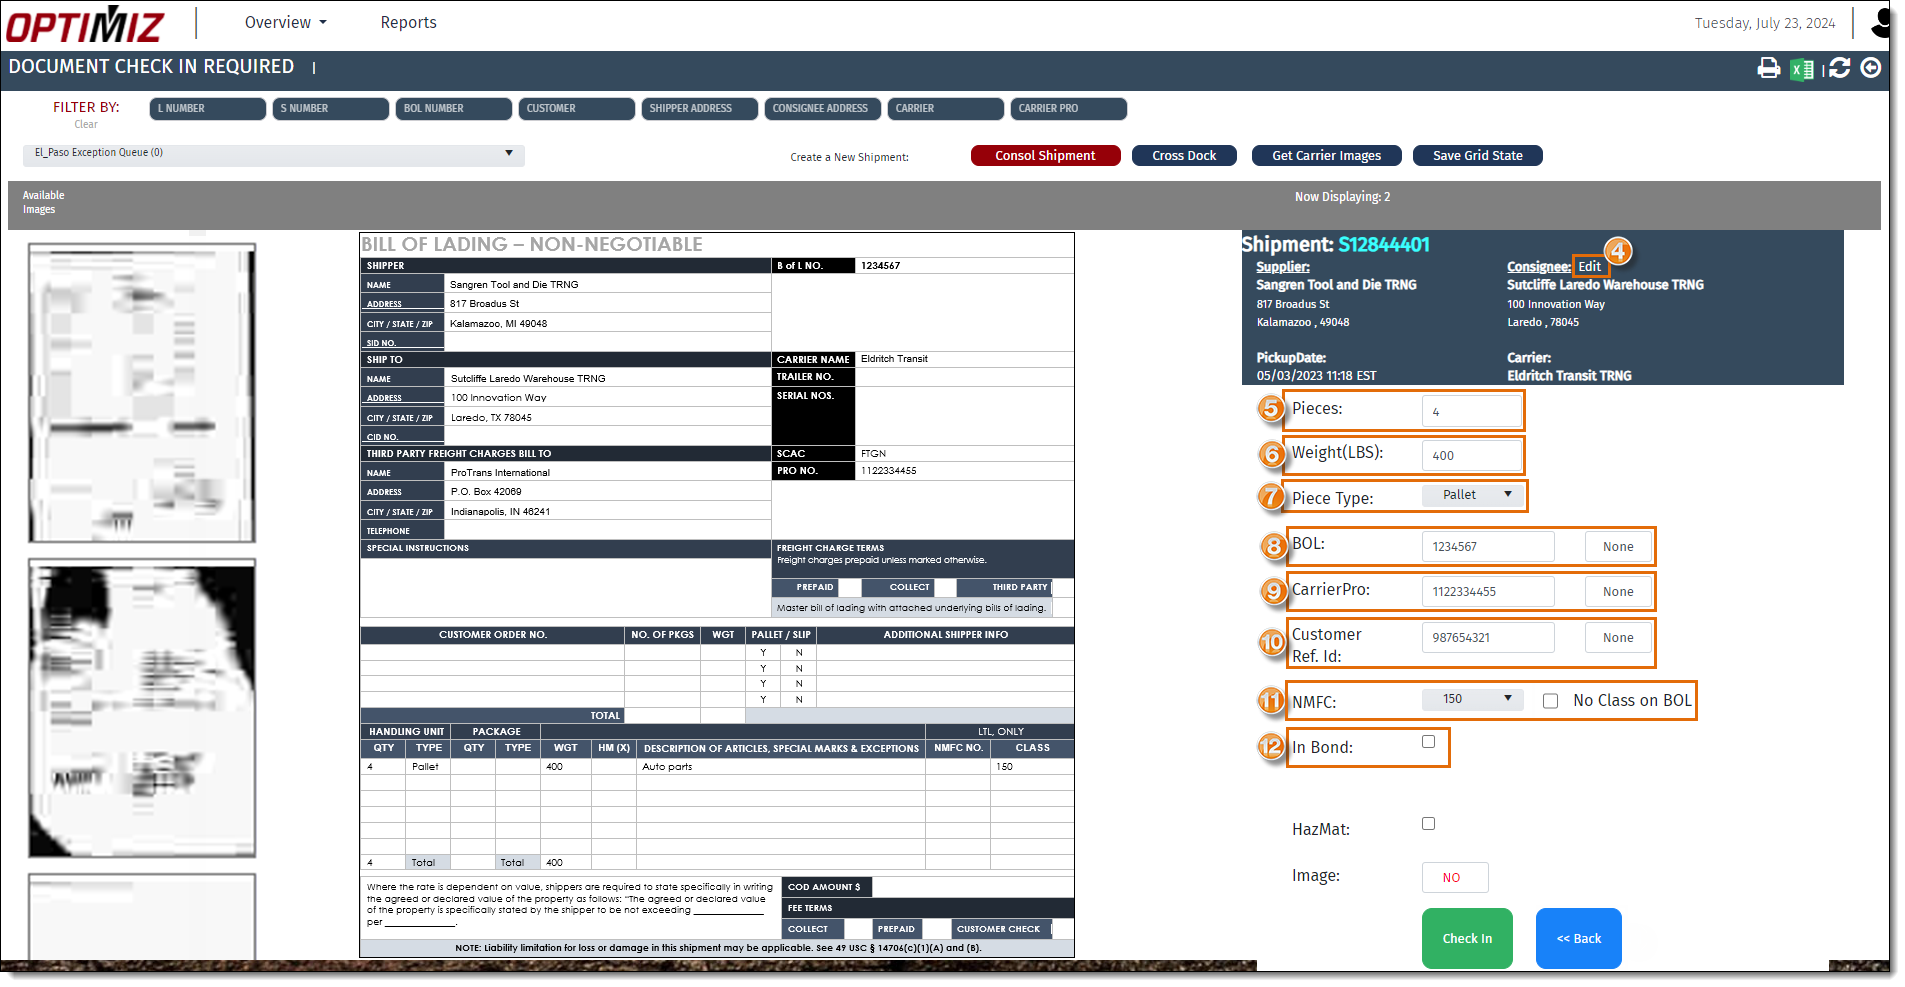
- Click Edit to update the shipment in Shipment Management if needed. See Edit a Shipment for more details.
- Enter or confirm the total Pieces shown on the paperwork.
- Enter or confirm the total Weight shown on the paperwork.
- Enter or confirm the Piece type shown on the paperwork.
- Enter the BOL number or click None if the paperwork does not have one.
- Enter the Carrier Pro number or click None if the paperwork does not have one.
- Enter the Customer Reference ID if required.
- Enter the NMFC Class. Note: If the paperwork does not show the NMFC class, check the No Class on BOL check box.
- If the shipment is In-bond, select the In Bond check box.
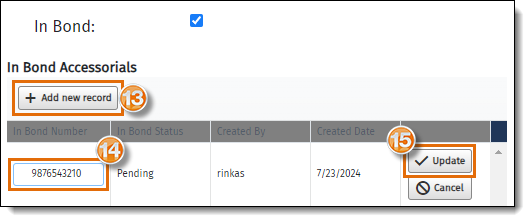
- The In Bond fields will open. Click Add New Record.
- Enter the In-bond Number.
- Click Update to add the In-bond number to the shipment.
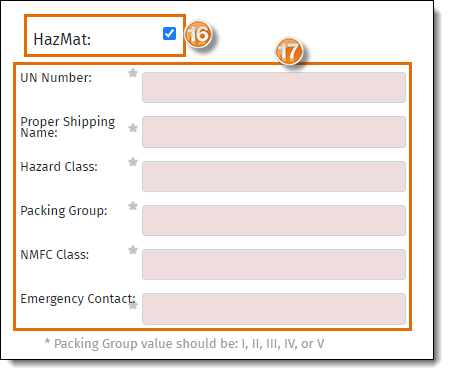
- If the shipment contains hazardous material, select the Hazmat check box.
- A new set of fields will open. Enter the required hazmat information in the Hazmat fields.
- After entering and verifying all the required information, click Check In to confirm that the shipment information in Optimiz matches the paperwork received.
Result
The shipment information is updated, the selected images are uploaded to the shipment and disappear from the queue, the Check In window closes, the shipment disappears from the grid, and the shipment is checked in.
Next Steps
Now that you have Checked In a Shipment from the Document Check In tile, you need to: