Create a New Shipment

Overview
Suppliers can create and submit live shipments or shipment requests using the Create Shipment tab. The user credentials will determine whether or not approval is required for submitted shipments. Users will know whether their shipment was requested or automatically approved based on the confirmation notification that shows after clicking Save Shipment, which is explained further at the end of this page.
Process
To Create and Submit a Shipment:
- Click the Create Shipment tab.
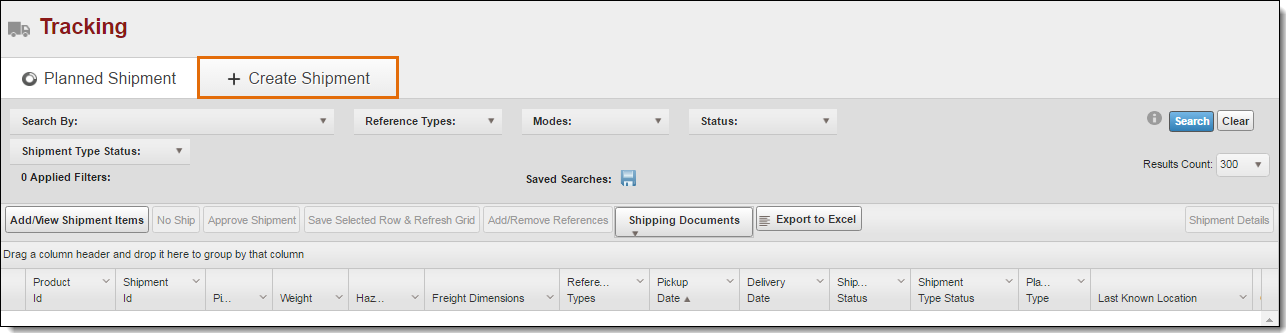
The Shipment Info tab opens.
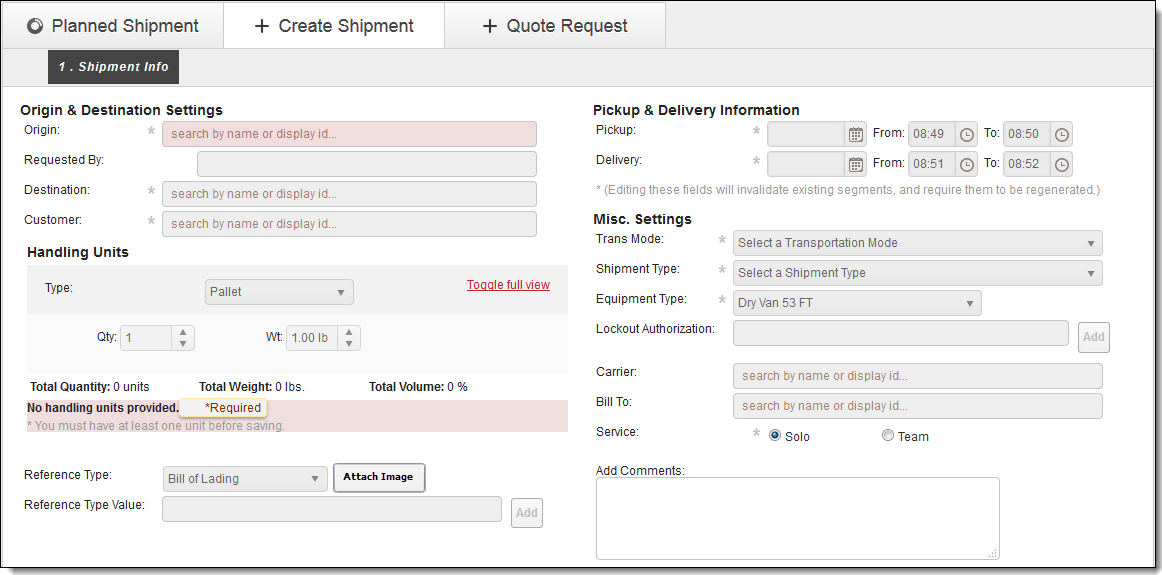
Origin & Destination Settings
The origin and destination, or O/D Pair, of the shipment describe where the shipment is coming from and where it is going. If the O/D Pair has been set up properly in the Customer Hierarchy, all the other information in this section will be completed automatically. If the origin or destination do not appear when searching, contact ProTrans.
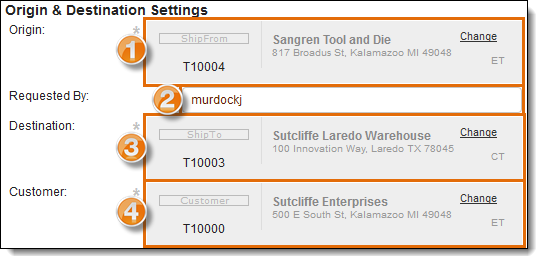
- Search for and select the Origin.
- Optimiz will automatically fill this field with the user name. If the shipment is requested by someone else, enter the name of the requester.
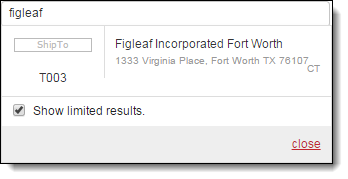
- Search for and select the Destination. By default, Optimiz will only display ShipTo entities that have an established Trading Partner relationship with the selected Origin in the Customer Hierarchy. To select a different ShipTo, uncheck the Show limited results checkbox.
- Search for and select the Customer, if needed. Optimiz will automatically fill this field if a relationship already exists between the Origin and Destination in the Customer Hierarchy.
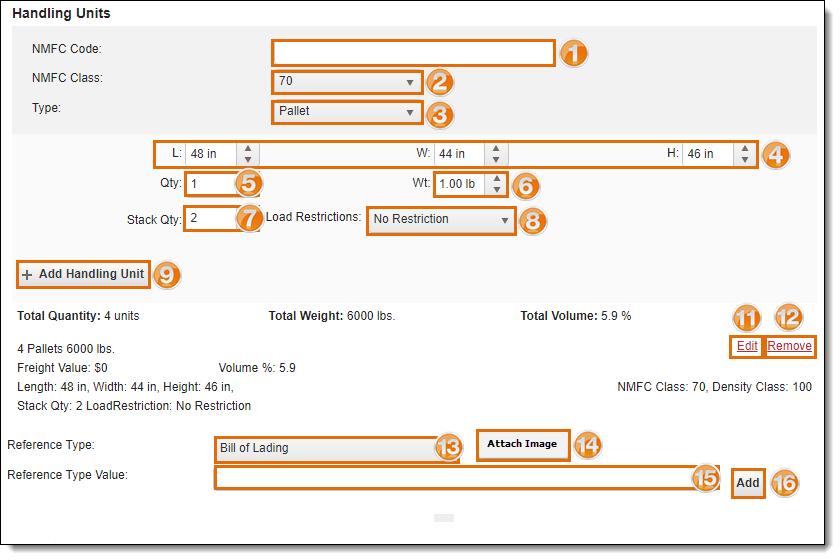
Handling Units
The handling units of a shipment describe what is physically being moved. Handling unit information is important to properly plan trailer utilization and to accurately bill the customer. If default shipment items are defined in the Customer Hierarchy for the selected O/D Pair, these fields will fill automatically.
- Enter the Product Description.
- Enter the NMFC Code.
- Select the NMFC Class.
- Select the Type of handling unit, such as Pallet or Carton.
- Edit the Length, Width, and Height if necessary.
- Enter the Qty, which is how many handling units of this type are being shipped.
- Enter the Wt, which is the total weight of all handling units of this type being shipped.
- Enter the Stack Quantity.
- Select Load Restrictions if necessary.
- Click Add Handling Unit. Added handling units will be listed below the form. Even if all handling unit fields are filled automatically, the handling unit must still be added to the shipment.
Note: If you have a shipment with multiple products, NMFC codes, NMFC classes, or pallets of varying dimensions, enter the handling unit information for each of them following steps 1 - 10. The exception to this is for consolidation shipments. That is, shipments that will travel to a ProTrans facility. For consolidation shipments, only enter the handling unit information for each set of different dimensions, as you can only input one handling unit type at order entry. ProTrans will update the information once the shipment arrives at our location.
- If you need to edit an existing handling unit, Click Edit to modify any existing handling units. Make changes directly in the form as described above. When complete, click Save Handling Unit to confirm changes, or Cancel to discard them.
- Click Remove to remove any added handling units from the shipment.
- Select the Reference Type to add a reference if needed. Examples include a bill of lading (BOL) or customer PO.
- Click Attach File to upload an image.
- Enter the Reference Type Value if adding a reference. Examples include a bill of lading (BOL) number or customer PO number.
- Click Add if a reference type value was entered.
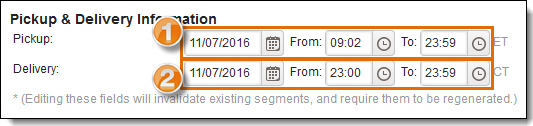
Pickup & Delivery Information
The pickup and delivery information describe for the carrier when they are expected to pick up and deliver the shipment. Times are always listed in the local time zone for the stop.
Optimiz will automatically calculate the transit time from pickup to delivery. If you need the calculated delivery date changed, do not submit your request. Please contact your ProTrans representative.
- Select the Pickup date and time from the date and time pickers. This is the window during which the shipment can be picked up. The date will default to the current date unless it is past noon, in which case, the date will roll over to the next day. Optimiz will automatically calculate the transit time from pickup to delivery. If you need the calculated delivery date changed, do not submit your request. Please contact your ProTrans Supply Chain Manager.
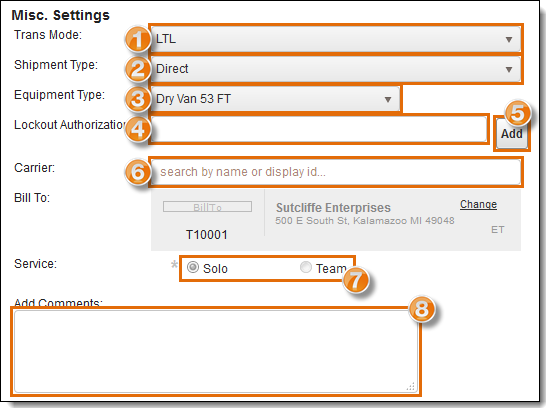
Misc. Settings
- Select the Trans Mode, which is how the shipment will be transported (Truckload, Air, LTL, etc.) Optimiz will automatically fill this field if a relationship already exists between the Origin and Destination in the Customer Hierarchy.
- Select the Shipment Type. Optimiz will automatically fill this field if a relationship already exists between the Origin and Destination in the Customer Hierarchy.
- Select the Equipment Type needed for the shipment.
- Enter the Lockout Authorization number if needed.
- Click Add if a lockout authorization number was added.
- Enter the Carrier and click the appropriate selection if needed. Optimiz will automatically fill this field if a relationship already exists between the Origin and Destination in the Customer Hierarchy.
- Select a Service of Solo or Team.
- Enter any additional information in the Add Comments box.
Special Services
- Check any Special Services that apply to the shipment. If entering Hazmat information, see Add Hazmat Information. If entering In-Bond information, see Add In-Bond Information.
- Click Save Shipment to create the shipment request or Cancel to discard the shipment.
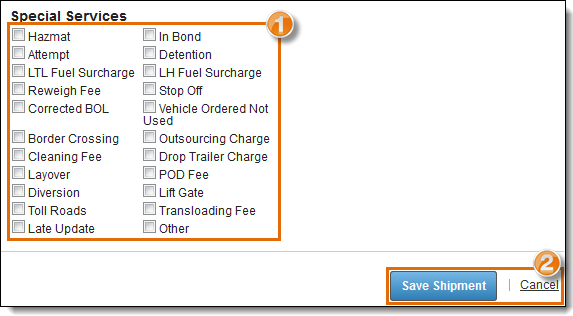
- A confirmation dialogue box appears with the Reference ID number for the request. Click Dismiss to close the message.

- If the Supplier Portal user is configured to not require authorization for created shipments, the Save action will create the shipment directly. A confirmation box appears with the Shipment ID, Load ID, and Pickup Carrier. Click Dismiss to close the message.

Result
The shipment or shipment request is saved and ready for processing by a ProTrans employee. If no review is required, the shipment is scheduled for pickup.