Confirm a Shipment
Objective
User will be able to confirm and record the physical characteristics of a shipment and print pallet barcodes to apply to the freight.
Overview
Prerequisites
- Before you can Confirm a Shipment, the Document Check In Required process must be completed.
- A printer must be set up for the user before labels can be printed. See Enter Default Information for Dock Session for information on making printers available to users from the Optimiz desktop application and Change Printer for information on selecting a printer in the Optimiz mobile app.
Process
To Confirm a Shipment:
- Search for the shipment to be confirmed. See Search for a Shipment for details.
- Verify the origin and destination in Optimiz mobile matches the physical freight and the measurement report or BOL.
- Then tap Confirm Origin/Destination.

- A message will appear asking to confirm the origin and destination information are correct on the freight. If the origin and destination on the freight do not match the scanner, do not proceed. Stop and verify you have the correct shipment number according to the Measurement Report. If the Measurement Report has the correct shipment number, check Optimiz to validate the check in process was completed correctly.
- If the origin and destination are correct, tap Yes to confirm and continue.
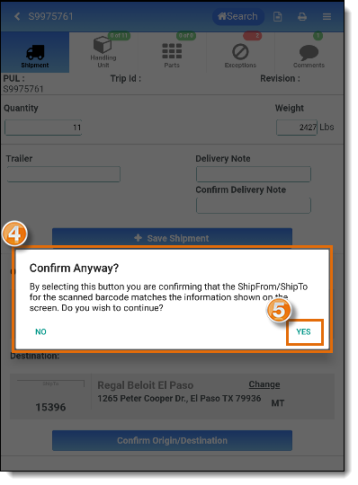
- The origin and destination will be confirmed, and the Confirm Origin/Destination button will fade out and change to Origin/Destination Confirmed.
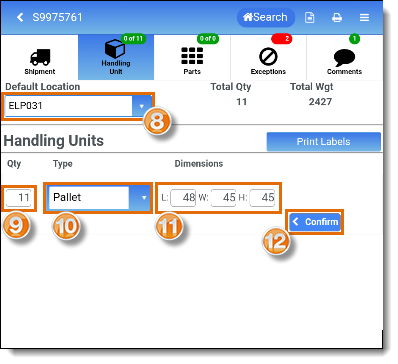
- Tap the Handling Unit tab.

- The Default Location shows the warehouse location the freight will be assigned to based on the user's profile. A different location can be selected from the dropdown if needed.
- Confirm that the physical Quantity of handling units matches the total count for the shipment. If quantity does not match, review the information input during the check in process prior to completing the confirmation process. Note: Some shipments may have one or more handling unit with different dimensions than other handling units in the shipment. Each set of dimensions must be entered individually. See Confirm a Shipment with Handling Units of Different Dimensions to update and confirm shipments that have handling units of different dimensions.
- Confirm that the Type of handling unit received is accurate.
- Confirm that the Dimensions of the handling unit received are accurate, and update if necessary.
- Tap Confirm to save the handling unit quantity, type, and dimensions.
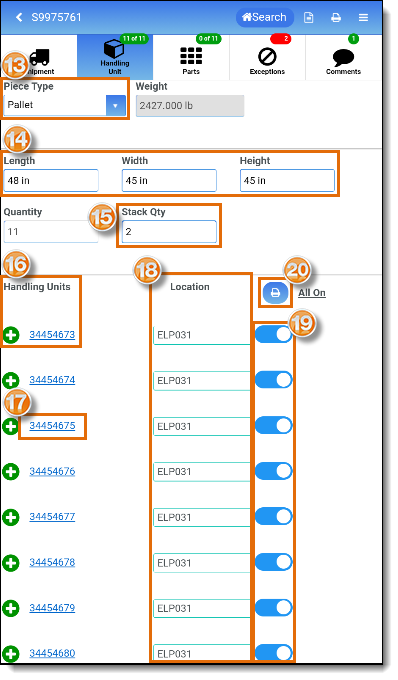
The Handling Unit Detail page opens. The shipment status in Optimiz will update to Confirmed at Consol Hub. The selected handling unit is flagged as received and assigned to the selected warehouse location when the page opens. Any changes to the handling unit's details are saved automatically.
- Changes to the Piece Type can be made if needed.
- Changes to the Length, Width, and Height of this group of handling units can be made if needed.
- Confirm the Stack Qty of this group of handling units and change if needed.
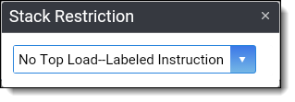
If the Stack Quantity is changed to 1, a pop-up window will open requiring a Stack Restriction explanation.
- Barcode numbers for each handling unit will populate under Handling Units.
- Tap and hold the handling unit ID to change the automatically assigned ID if needed - for example, to use a customer barcode rather than a ProTrans barcode.
- The warehouse location assigned to the handling unit barcode will populate in the Location field.
- The toggle switches show which barcodes for the shipment will be printed. All switches will be On by default. Slide the toggles to the left to deselect a barcode if needed.
- Tap the print icon to print the labels for the shipment on the user's default printer. See Change Printer for details on selecting a printer.
Result
The handling unit is confirmed and assigned to the selected floor location of the hub. All selected labels are printed.