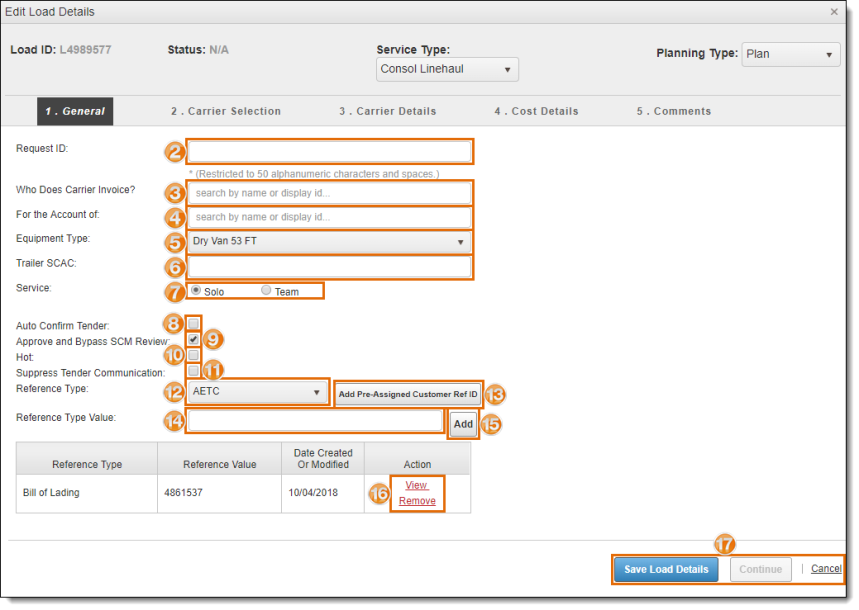
Enter General Details
Overview
Process
To Add General Details:
- Access Load Details. See Access Load Details for details.
- Type the Request ID if available.
- Search for and select the Responsible Party (where the carrier is to send the invoice to receive payment.) This is a required field.
- Search for and select the Responsible Party Location (provides a location-level entity to tie the Responsible Party to the load and lets Accounting know where to allocate the expense).
- Select the Equipment Type from the drop-down list (the type of equipment that will be used to haul the load. The equipment type from the shipment is selected by default).
- Enter the Trailer SCAC (carrier SCAC for the trailer, not the truck.) This defaults to the SCAC of the carrier assigned to the tractor and should be changed if that tractor is pulling a different carrier's trailer.
- Select the Service needed for the load.
- Select Auto Confirm Tender to indicate that ProTrans will automatically accept the tender on behalf of the carrier upon tendering. If the check box is deselected, the carrier will have to confirm via the Carrier Portal or EDI that they are accepting or declining the tender request. If this is a contracted lane, this box is usually selected. If in doubt, refer to the carrier's contract to determine if Auto Confirm should be used.
- Select the Approve and Bypass SCM Review check box if this load does not need to be sent to Planning Management for further review by a Supply Chain Manager (selected by default for one time loads).
- Select the Hot check box if this load requires closer monitoring. Note that this is not the same as Expedite (see Expedite a Load.)
- If the intended carrier does not need to be notified with a tender request, select Suppress Tender Communication. If selected, Optimiz will not send tender information to the carrier by email.
- Select a Reference Type to add to the load, if needed.
- Click Add Pre-Assigned Trip ID to add the selected Reference Type to the load with the next available value from the customer's list of Pre-Assigned Customer Reference IDs. See Configure Pre-Assigned Customer IDs for details on adding Pre-Assigned Customer Reference IDs.
- Enter the Reference Type Value for the selected Reference Type, if needed.
- Click Add to add the Reference Type to the load.
- Click View to view any images associated with an existing Reference Type or Remove to remove the Reference Type.
- Click Save Load to save the changes and close Load Details, Continue to add additional information, or Cancel to discard any changes.

Result
The general details are added to the load.