Import Entities from a Spreadsheet
Overview
Due to the extensive nature of most customers' supply chain networks, the process of manually creating entities for every ship from, ship to, and carrier for a new customer can be time-consuming. To expedite the process, users can create multiple entities at once by creating and uploading a spreadsheet containing the relevant data.
There are some limits to what entity information can be imported from a spreadsheet:
- Bill To entities must be created manually by the Accounting department.
- Carrier entities imported from a spreadsheet must be manually edited after the import to add transportation modes, tender methods, and contacts. To ensure they are not used before this process is completed, all Carrier entities are created in Inactive status.
- Relationships between entities must be created manually or by separate import through the Customer Hierarchy.
- Any information not included in the spreadsheet, such as a Hub entity's default printer or fleet information for a Carrier entity, must be entered manually.
Optimiz does not check for duplicates during the upload process. Be certain no duplicate entities exist in the spreadsheet before uploading it to Optimiz.
Process
To Download the Template Spreadsheet:
- Hover the mouse over Entity.
- Click Entity Import.

- Click Download Template.
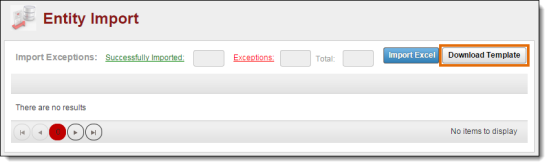
The template spreadsheet is downloaded to the user's computer.

To Complete the Template Spreadsheet:
The user must manually enter the data into the corresponding column (field name) of the spreadsheet. There are 53 possible fields in the template; some are required, but many are optional. The description of each field can be found below.
Address Information
- Display ID (optional) - The display ID to be assigned to the entity. This should typically be left blank, which causes Optimiz to automatically assign the next available display ID to the entity. Entering a value already in use by another entity can cause serious errors in the operation of Optimiz.
- Name (required) - the name of the entity, to a maximum of 50 characters.
- Address 1 (required) - The street address of the entity.
- Address 2 - 4 (optional) - Other street address information for the entity.
- City (required) - The city in which the entity is located.
- State (required) - The state in which the entity is located.
- Postal Code (required) - The postal code of the entity.
- Country (required) - The country in which the entity is located.
- Latitude (optional) - The latitude position of the entity. If left blank, Optimiz will perform a search for the latitude based on the address.
- Longitude (optional) - The longitude position of the entity. If left blank, Optimiz will perform a search for the longitude based on the address.
Contact Information
All contact information is optional. However, if any contact information is provided, a First Name must be entered. Include first and last name, phone number, fax number, and email address of the primary contact for the entity, if available.
Hours of Operation
All hours of operation information is required. Enter the opening time in From and the closing time in To for each day of the week.
Hub Information
- Hub (optional) - Enter Yes if the entity has the Hub type. Otherwise, leave the field blank.
- Dock Code (optional) - Enter the dock code of the entity. Only valid for entities with the Hub type.
Customer Information
- Customer (optional) - Enter Yes if the entity is a customer. Otherwise, leave the field blank. A customer entity can have no other entity types; if this field is set to Yes, all fields under Hub Information, Ship From Information, Ship To Information, and Carrier Information must be left blank.
Ship From Information
All fields in this section are optional, and are only valid if there is a Yes under Ship From.
- Ship From - Enter Yes if the entity has the ShipFrom type. Otherwise, leave the field blank.
- Dock Code - Enter the dock code of the entity. A reference type of Dock Code will be added to the ShipFrom entity with this value.
- DUNS - Enter the DUNS code of the entity. A reference type of DUNS will be added to the ShipFrom entity with this value.
- AIAG Vendor (optional) - Enter the AIAG vendor code for the entity. A reference type of AIAG Vendor Code will be added to the ShipFrom entity with this value.
Ship To Information
All fields in this section are optional, and are only valid if there is a Yes under Ship To.
- Ship To - Enter Yes if the entity has the ShipTo type. Otherwise, leave the field blank.
- Dock Code - Enter the dock code of the entity. A reference type of Dock Code will be added to the ShipTo entity with this value.
- DUNS - Enter the DUNS code of the entity. A reference type of DUNS will be added to the ShipTo entity with this value.
- Plant Code - Enter the plant code for the entity. A reference type of Plant Code will be added to the ShipTo entity with this value.
Carrier Information
Most fields in this section are optional; only Tenant is required. All are only valid if there is a Yes under Carrier.
- Carrier - Enter Yes if the entity has the Carrier type. Otherwise, leave the field blank.
- SCAC - Enter the Standard Carrier Alpha Code of the entity.
- Acct ID - Enter the Posting Account ID of the entity. This is the entity's account ID in Sun Systems.
- Rating ID - Enter the Rating System ID of the entity.
- Payment Terms - Enter the Payment Terms for the entity. The term must already be an option in Optimiz's Payment Terms master data. See Add or Edit Payment Terms for details.
- Payment Priority - Enter the Payment Priority for the entity. The priority must already be an option in Optimiz's Payment Priority master data. See Add or Edit a Payment Priority for details.
- Payment Method - Enter the Payment Method for the entity. The method must already be an option in Optimiz's Payment Method master data. See Add or Edit Payment Methods for details.
- Payment Currency - Enter the Payment Currency for the entity. The currency must already be an option in Optimiz's Payment Currency master data. See Add or Edit Payment Currencies for details.
- Tenant (required) - Enter the name of the entity's primary Tenant. This will typically be "ProTrans SCAC - PNII".
- Primary Expense Acct - Enter the Primary Expense Acct for the entity's Tenant.
- Expense Account Desc - Enter the description of the primary expense account for the entity's tenant.
- Credit Limit - Enter the credit limit of the entity. Credit limits are typically set to $9,999,999.00.
- 1099 Type - Enter the 1099 Type required for the entity. The 1099 Type must already be an option in Optimiz's 1009 Type master data. See Add or Edit a 1099 Type for details.
To Import the Completed Spreadsheet:
- Hover the mouse over Entity.
- Click Entity Import.
- Click Import Excel.

The Open dialogue box opens.
- Find and select the completed template spreadsheet.
- Click Open.

Optimiz processes the spreadsheet and creates entities for all valid entries. Invalid entries display as import exceptions.
- Click Exceptions to see all entries with errors.
- Click the link for any error under Status.
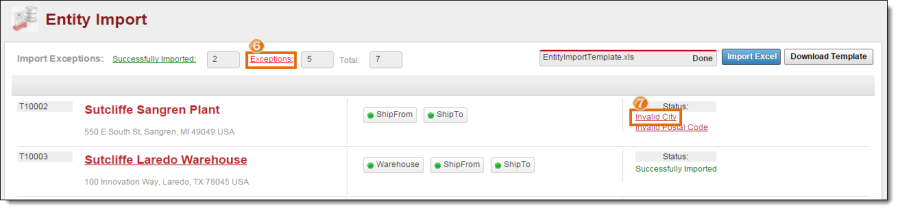
A new window related to the error will open.
- Correct all errors. See individual entity creation and editing topics for details on valid entity data.
- Repeat steps 7 - 8 for all links under Status for each entity with errors.
Result
All entities from the spreadsheet are created and available for use throughout Optimiz.