Configure Pre-Assigned Customer IDs
Overview
Some customers require unique identifiers, such as a Trip ID, to be attached to all their shipments or loads in addition to ProTrans's tracking numbers. These can be entered in the Customer Hierarchy as Pre-Assigned Customer IDs. Once a range of pre-assigned customer IDs is added to the Hierarchy, Optimiz adds them sequentially to each shipment or load.
- Multiple ranges of pre-assigned customer IDs can be added for a customer, but only one can be active at any time.
- The currently active set of IDs is determined by the effective date range attached to each set.
- The date ranges of different sets of IDs cannot overlap.
- Ranges of IDs cannot be deleted; they can only be expired.
- If a Trip ID is assigned at the load level, it will appear as a Consolidated Trip ID.
When configuring pre-assigned customer IDs a Shipment Reference Type or Load Reference Type must be specified. One or both may be assigned as necessary. Once configured, Pre-Assigned Customer IDs will appear as a Reference Type after the shipment or load has been saved.
When should I configure pre-assigned customer IDs?
Add pre-assigned customer IDs to the Customer Hierarchy when the customer provides a range of identifiers that must be attached to each of their shipments.
Process
To Add a Pre-Assigned Customer ID:
- Open the Customer Hierarchy. See Access the Customer Hierarchy for details.
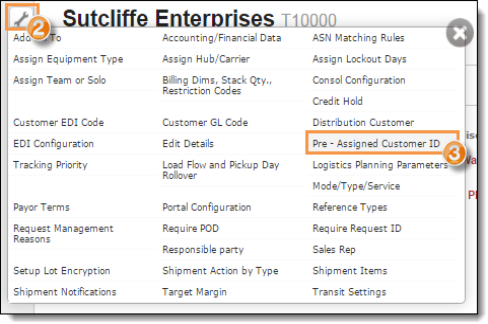
- Click the wrench at the Customer level.
- Click Pre-Assigned Customer ID.
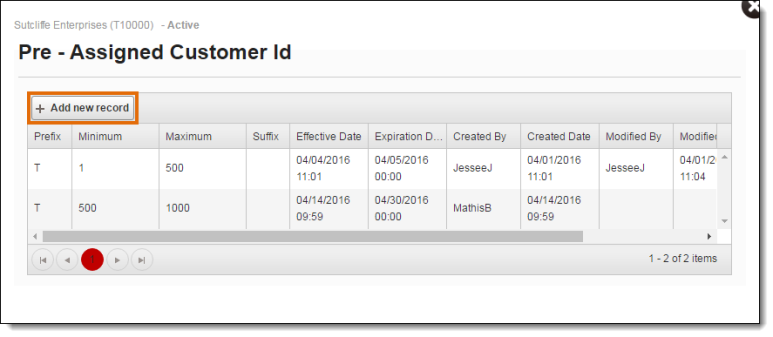
The Pre-Assigned Customer ID window opens.
- Click Add New Record.
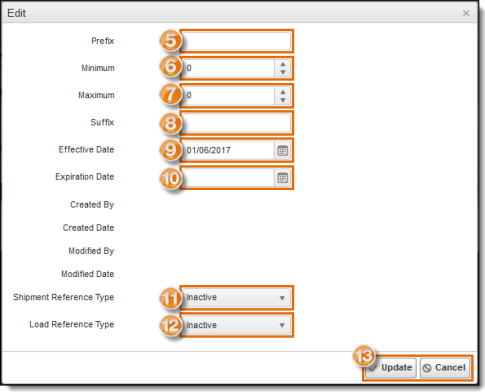
The Edit dialogue box appears.
- Enter any Prefix to be added at the start of each ID.
- Enter the Minimum number of the range of IDs.
- Enter the Maximum number of the range of IDs.
- Enter any Suffix to be added at the end of each ID.
- Enter the Effective Date of the current range of IDs.
- Enter the Expiration Date of the current range of IDs if needed.
- Select the Shipment Reference Type if necessary.
- Select the Load Reference Type if necessary.
- Click Update to save the range of IDs or Cancel to discard it.
To Edit a Pre-Assigned Customer ID:
- Open the Customer Hierarchy. See Access the Customer Hierarchy for details.
- Click the wrench at the Customer level.
- Click Pre-Assigned Customer ID.

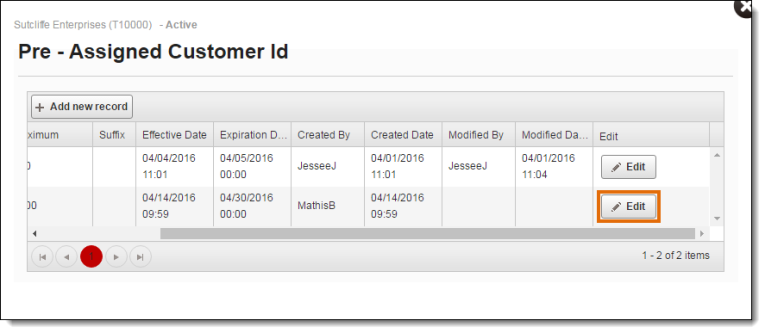
The Pre-Assigned Customer ID window opens.
- Click Edit on the line of the ID set to be updated. Scroll the grid to the right if the Edit button is not visible.
The Edit dialogue box opens.
- Update the Expiration Date if necessary.
- Update the Shipment Reference Type if necessary.
- Update the Load Reference Type if necessary.
- Click Update to save the changes to the ID set or Cancel to discard them.

Result
The range of pre-assigned customer IDs is added to the Customer Hierarchy and will be added sequentially to all shipments or loads created for the customer.